

A Step By Step Approach: How To Connect Your Nuxt App To MongoDB, Authenticate With @nuxtjs/strapi And Query API Using GraphQL & Apollo.


In this tutorial, we will use powerful technologies like Nuxt (a Vue framework), Strapi (a headless CMS) and GraphQL. Without much ado, let's set the ball rolling.
NB: This tutorial is broken-down so absolute beginners can use too.
Table of content
- Introduction
- Setup Backend
- Setup Frontend
- Deployment
Introduction
Why Nuxt? Because I am nuxty.
And what is that? Never mind. (hahahaha)
Nuxt is a very intuitive framework that makes web development simple and very powerful. Check here to see how powerful nuxt is.
Strapi is a very powerful headless CMS and in its documentation, it says: Strapi is a flexible, open-source Headless CMS that gives developers the freedom to choose their favorite tools and frameworks while also allowing editors to easily manage and distribute their content. Kindly visit here for more on strapi.
GraphQLgives clients the power to ask for exactly what they need and nothing more. Part of its documentation reads: GraphQL is a query language for APIs and a runtime for fulfilling those queries with your existing data. GraphQL provides a complete and understandable description of the data in your API. Visit here for more on GraphQL.
Setup Backend Let us start with setting up our backend with MongoDB and Strapi. Create an account with MongoDB if you do not have one. Then create a project and then create a cluster in it (for this tutorial, I recommend you go for the free version). When that is done, under security on the left, select Database Access and authenticate user by creating admin username and password. Keep both username and password secured and handy as they will be applied later. Again, still under security, select Network Access and whitelist your connection so you can have access to it from anywhere. Right now, you are done creating your MongoDB cluster.
Now let us complete the setting up of our backend by hooking our MongoDB cluster with Strapi. Lets setup Strapi, you can do this with either npx or yarn as shown below:
npx create-strapi-app backend// if you choose npx
yarn create strapi-app backend// if you choose yarn
then follow the instructions:
for installation type, take custom
for database, take mongo
for dbname, backend
for host, go back to your cluster in mogoDB and click connect, then select Connect your application and you will see something like below: (remember that yours will be different from mine):
mongodb+srv://backend:<password>@backend.fvsa9.mongodb.net/<dbname>?retryWrites=true&w=majority
only copy from after the @ and end at .net. That's
backend.fvsa9.mongodb.net
and paste it in host of your strapi setup
for +srv, enter true
for username and password, remember I earlier said you should keep the admin username and password you entered while setting up your cluster, enter them now.
for ssl, enter Yes if you want a secured connection.
When everything is done, navigate to your strapi folder and in the terminal, enter
npm run develop // if you are using npm
yarn develop // if you are using yarn
and Strapi will build your backend admin dashboard which is running at localhost:1337/admin. With this, your backend is fully setup.
By default, the APIs generated with Strapi use REST conventions, now, let's transform them to GraphQL
npm run strapi install graphql // if you are using npm
yarn strapi install graphql // if you are using yarn
Now restart your server with
npm run develop // if using npm
yarn develop // if using yarn
Believe me, your backend is done and ready, hurray!
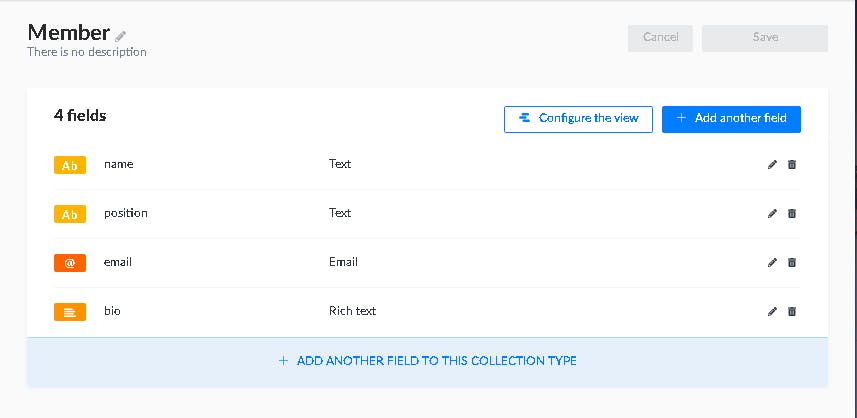
Let us do a little testing before we proceed. Got to your backend admin dashboard on localhost:1337/admin. On the left hand panel, click on Contents-Type Builder, then select Create new collection type. Let's name our type member. Note that it didn't start with a capital letter and there's no s at the end. Just watch Strapi do the magic. For the collection type fields, let's select
Text and Short text for name
Text and Short text for position
Email for email
Rich text for bio
then click save. Below is what you get
On the left hand side, you can see Strapi's magic, we now have Members and that's where we will create our collections of members. Click it and create some members. Ensure you save and publish each member after creation. When you click Members again, you will be able to see all the members you have created and if you click collections in your cluster, you should be able to see all the members you have create and any modification there will be updated on your Strapi admin dashboard too. Now, try to view our API on localhost:1337/members. Unfortunately, you will receive a 403 forbidden error. To grant the necessary permission to our APIs, go to settings on your dashboard, under Users & Permissions Plugin, select Roles and then select *Public. Scroll down to look for members and check find and findone permissions and save the changes. Go back to Authenticated under same Roles grant same permissions. Now go back to localhost:1337/members and you will see all your members. Can you see how powerful and easy it is to use Strapi?
Let us also test the power of the GraphQL we installed earlier. Now navigate to localhost:1337/graphql. This will immediately take you to the GraphQL playground where you can test and manipulate your API. Let's play around with our API a little by doing the followings
{
   members {
       id
       name
       email
       position
   }
}
then hit the play button. if you did everything well, you should see this.
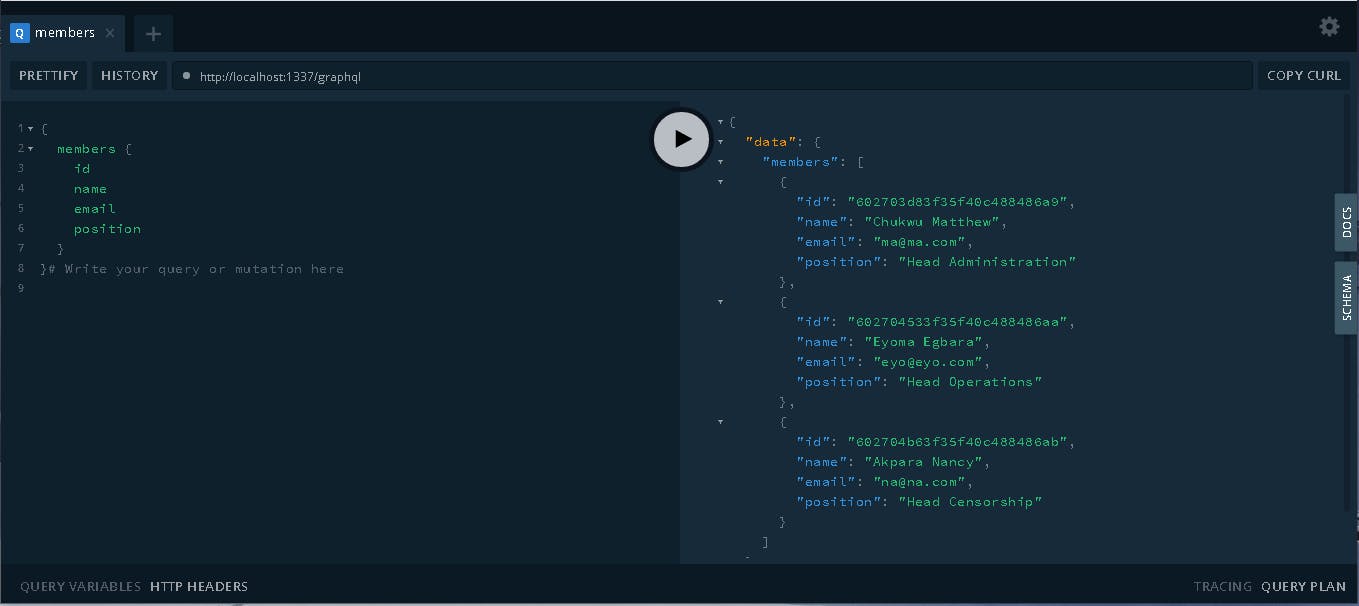
Did you notice that we left bio out? That's the power of GraphQL, meaning that you can only pull the content of API you want to reduce download time, etc. For now, that should be all with our backend, let us work on the frontend.
Setup Frontend
Navigate to the folder where you want to install your nuxt and do the following
npx create-nuxt-app frontend
// or
yarn create nuxt-app frontend
// or
npm init nuxt-app frontend
Follow the instructions and select what you are very comfortable with but for this tutorial, I will go for tailwindcss, ssr and git. When it is done, you should have nuxt installed in your local machine. Then navigate to the folder and run your nuxt app
npm run dev
// or
yarn dev
We will be needing some modules to interact with our backend, @nuxtjs/strapi for authentication and graphql for API query. Let's install the modules
npm install @nuxtjs/strapi
// or
yarn add @nuxtjs/strapi
Next is to register it in nuxt.config.js
modules: [
 ......
  '@nuxtjs/strapi',
],

strapi: {
  entities: [
      'members',
  ],
},
To be able to use graphql from our frontend, we to do a few more installations
npm install @nuxtjs/apollo graphql
// or
yarn add @nuxtjs/apollo graphql
then add the followings in the nuxt.config.js
modules: [
  ........
  .........
  '@nuxtjs/apollo',
],
apollo: {
  clientConfigs: {
    default: {
      httpEndpoint: 'http://localhost:1337/graphql'
    }
  }
},
In this project, only authenticated members can view the members list. Now, let us create a signup, login and members pages. In pages, create a 3 folders and name them signup, login and members. Then in each of the folders, create an index.vue file. But in the index.vue file of pages itself, paste the following code.
<template>
  <div class="w-full h-screen flex items-center justify-center">
    <div>
      <h1 class="block text-6xl font-thin text-center">Welcome To The Nuxtys Club</h1>
      <div class="mt-20 flex justify-center text-center">
        <NuxtLink to="/login" class="w-full max-w-xs block justify-items-center bg-gray-900 text-gray-400 text-4xl rounded-md"> Login </NuxtLink>
      </div>
    </div>
  </div>
</template>
<script>
export default {
  middleware: 'authenticated',
}
</script>
You may modify the above to your taste or do something different but ensure you do not derail from what we are trying to achieve in this tutorial.
In the index.vue file of signup, paste the following code
  <template>
  <div class="bg-gray-100 rounded-md border shadow-lg max-w-md mx-auto text-center my-12">
    <div v-show="error !== ''" class="py-6 px-4 bg-red-200  text-red-500 rounded-t-md ">
      <p>{{ error }}</p>
    </div>
    <h1 class="text-4xl text-gray-400 tracking-wider font-bold mt-5">Signup</h1>
    <div class="p-4">
    <form @submit="createUser">
      <div>
        <input
          v-model="email"
          required
          class="p-3 my-5 rounded-md border bg-gray-100 focus:shadow-xl focus:outline-none focus:bg-white shadow-md w-full"
          type="email"
          placeholder="email"
        />
      </div>
      <div>
        <input
          v-model="username"
          required
          class="p-3 my-5 rounded-md border bg-gray-100 focus:shadow-xl focus:outline-none focus:bg-white shadow-md w-full"
          type="text"
          placeholder="username"
        />
      </div>
      <div>
        <input
          v-model="password"
          required
          class="p-3 my-5 rounded-md border bg-gray-100 focus:shadow-xl focus:outline-none focus:bg-white shadow-md w-full"
          type="password"
          placeholder="password"
        />
      </div>
      <div>
        <button
          class="w-full my-4 p-3 bg-gray-900 text-gray-500 font-medium text-xl tracking-wider rounded-md hover:bg-gray-600 hover:text-gray-200"
          type="submit"
        >
          {{loading ? 'Please wait...' : 'Signup' }}
        </button>
      </div>
       <div>
        <p>Already a member? <n-link class="text-blue-500" to="/login">Login</n-link></p>
      </div>
    </form>
    </div>
  </div>
</template>
<script>
export default {
  data() {
    return {
      email: '',
      username: '',
      password: '',
      error: '',
      loading: false,
    }
  },
  methods: {
    async createUser(e) {
      this.error = '';
      this.loading = true;
      e.preventDefault()
      try {
        const newUser = await this.$strapi.register({
          email: this.email,
          username: this.username,
          password: this.password,
        })
        console.log(newUser)
        if (newUser !== null) {
          this.error = '';
          this.loading = false;
          this.$nuxt.$router.push('/members')
        }
      } catch (error) {
        this.loading = false;
        this.error = error.message
      }
    },
  },
  middleware: 'authenticated',
}
</script>
Then in the index.vue file of the login page, paste the following
<template>
  <div class=" rounded-md border bg-gray-100 shadow-lg max-w-md mx-auto text-center my-12">
    <div
      v-show="error !== ''"
      class="py-6 px-4 bg-red-200 text-red-500 rounded-t-md"
    >
      <p>{{ error }}</p>
    </div>
    <h1 class="text-4xl text-gray-400 tracking-wider font-bold mt-5">Login</h1>
    <div class="p-4">
    <form @submit="loginUser">
      <div>
        <input
          v-model="identifier"
          required
          class="p-3 my-5 rounded-md border bg-gray-100 focus:shadow-xl focus:outline-none focus:bg-white shadow-md w-full"
          type="email"
          placeholder="email"
        />
      </div>
      <div>
        <input
          v-model="password"
          required
          class="p-3 my-5 rounded-md border bg-gray-100 focus:shadow-xl focus:outline-none focus:bg-white shadow-md w-full"
          type="password"
          placeholder="password"
        />
      </div>
      <div>
        <button
          class="w-full my-4 p-3 bg-gray-900 text-gray-500 font-medium text-xl tracking-wider rounded-md hover:bg-gray-600 hover:text-gray-200"
          type="submit"
        >
          {{ loading ? "Please wait..." : "Login" }}
        </button>
      </div>
      <div>
        <p>Not a member yet? <n-link class="text-blue-500" to="/signup">Signup</n-link></p>
      </div>
    </form>
    </div>
  </div>
</template>
<script>
export default {
  data() {
    return {
      identifier: "",
      password: "",
      error: "",
      loading: false,
    };
  },
  methods: {
    async loginUser(e) {
      this.error = '';
      this.loading = true;
      e.preventDefault();
      try {
        const user = await this.$strapi.login({
          identifier: this.identifier,
          password: this.password,
        });
        console.log(user);

        if (user !== null) {
          this.error = "";
          this.$nuxt.$router.push("/members");
          this.loading = false;
        }
      } catch (error) {
        this.loading = false;
        this.error = "Error in login credentials";
      }
    },
  },
  middleware: "authenticated",
};
</script>
<style></style>
In middleware folder, create an authenticated.js file and paste the following code
export default function({ redirect, $strapi }) {
    if ($strapi.user) {
        redirect('/members')
    }
}
Because we do not want a logged in member to login again when the login token hasn't expired so the authenticated.js will ensure that authenticated users are redirected to the members page at all times.
We are going to display the list of our members now using the graphql magic. Magic in the sense that the entire API must not downloaded but you state just what you want and just that will be downloaded. In the root of you project, create a folder and name it apollo, in it create another and name it queries, in it create another and name it member, in it create a file and name it members.gql, then paste the following in the file
query Members {
    members {
        name
        email
        position
        bio
    }
}
It is your choose to make on what to pull from your API Now, in the index.vue of your members page, paste the following codes
<template>
  <div>
    <Navbar class="fixed mx-auto sticky top-0" />

    <h1 class="uppercase tracking-widest font-semibold text-xl text-center my-6">All members</h1>
    <div
      v-if="$apollo.queries.members.loading"
      class="w-full h-64 px-6 flex justify-center items-center"
    >
      Members info still loading
    </div>
    <div v-else-if="members === null" class="w-full h-64 px-6 flex justify-center items-center">
      Members not loaded yet
    </div>
     <div v-else class="sm:grid md:grid-cols-2 lg:grid-cols-3 md:gap-2 px-4">
    <div v-for="(member, i) in members" :key="i">
      <div class="w-full max-w-sm mx-auto my-6 border rounded-md shadow-lg overflow-hidden">
        <div class="bg-blue-500 p-4 text-gray-200">
        <h1 class="font-semibold tracking-wider text-lg">{{ member.name }}</h1>
        <h3>{{ member.position }}</h3>
        <h3>{{ member.email }}</h3>
         </div>
         <div class="p-4">
        <p class="font-semibold tracking-wider">Bio</p>
        <p>{{ member.bio }}</p>
        </div>
      </div>
      </div>
      </div>
    </div>

</template>
<script>
import membersQuery from "~/apollo/queries/member/members";
export default {
  data() {
    return {
      members: [],
      query: "",
      error: null,
    };
  },
  apollo: {
    members: {
      prefetch: true,
      query: membersQuery,
    },
    // error(error) {
    //   this.error = JSON.stringify(error.message);
    // }
  },
};
</script>
<style></style>
See in the above code how the members.qgl file was imported.
If you have done everything accordingly, your members list will be smiling at you right now.
If everything is working fine in development mood, lets us deploy both frontend and backend to be sure it will also work fine in production.
Deployment
Firstly, we have to identify our API environment variables for control. We will need @nuxtjs/dotenv module to achieve this. Let' install and register it in our nuxt.config.js
npm install @nuxtjs/dotenv // if using npm
// or
yarn add @nuxtjs/dotenv // if using yarn
for nuxt.config.js
{
  modules: [
    ......
    ......
    '@nuxtjs/dotenv'
  ],
}
To use variables from your .env file, just append require('dotenv').config() to your nuxt.config.js as shown below
require('dotenv').config()

module.exports = {
  // your usual nuxt config.
}
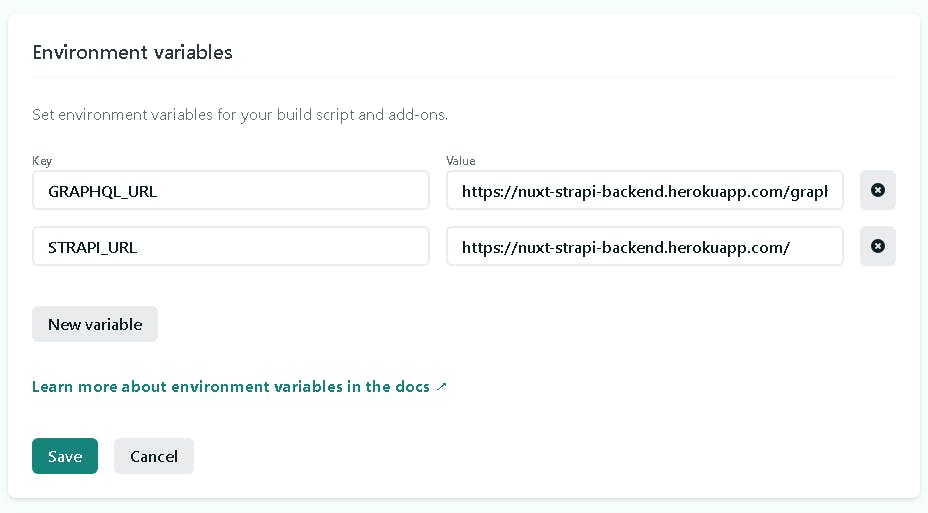
Next, in the root of your project, create a .env file and paste the following
STRAPI_URL=http://localhost:1337
GRAPHQL_URL=http://localhost:1337/graphql
By default, the .env file is ignored in the .gitignore file. You can double check anyways.
Next, let's configure the environment variables in the nuxt.config.js by changing the following configs
 apollo: {
        clientConfigs: {
            default: {
                httpEndpoint: process.env.GRAPHQL_URL || 'http://localhost:1337/graphql'
            }
        }
    },
Next, both frontend and backend folders will be pushed to Github,(if you don't have a github account, it is recommended you create one now), then deploy the backend to Heroku and the frontend to Netlify. We will start with the backend.
- go to your page on github and start a new repository
- give your repo a name (I will give mine nuxt-strapi-backend) and create it.
- Then in the terminal of your project, initialize git and do the followings
git init
git add .
git commit -m "first commit"
git remote add origin *(enter your repo url here)*
git push -u origin master
And that's it. Refresh your github page and see your code pushed. Below is the source code on github nuxt-strapi-backend
Now let us deploy it to Heroku. Create a new app, connect to github where your source code is then deploy. If this is not very clear to you, look up for tutorials on how to deploy apps on heroku. I might just do a tutorial on that soon.
Time to deploy our frontend on Netlify. The first step is to push your source code to github like we did earlier. (same process as above). Here is the nuxt-strapi-frontend source code. Now, create an account with netlify if you don't have one already. Then click on New site from Git and follow the instructions. In the Basic build settings, enter yarn generate for Build command and dist for Public directory. Then for the Advanced build settings enter for STRAPI_URL, and /graphql for GRAPHQL_URL.

That's it. You are now NUXTY. You have finally built your nuxt app with the latest technologies and deployed it. Congratulations.
Here is my link to the frontend on netlify.
Congratulations once again. See you later!